For some people, calibration can be the most confusing part about this whole project so I'm posting this guide/documentation a little earlier than planned and the post will be refined and updated along the way instead.
Button tab
This is where you assign your keyboard/mouse/gamepad etc. to emulated buttons.

Axis tab
This is where you assign your keyboard/mouse/gamepad etc. to emulated analogs.

Overall tab
Under the Overall tab you may assign Triggers for multiple profiles and set up variable Stick intensities.

Multiple profiles
Useful for situations like:
- Tactical changes in button layout during gameplay!
- Changing sensitivity of aim in FPS games on the fly - fight that sticky ADS!
- Using a controller with not enough buttons - holding down one designated button can change the function of all the other ones!
- Probably something we haven't thought of...
To copy your profile from slot 1 to slot 2, you first need to make sure profile 1 is selected under the Profile menu, then under the Edit menu select Copy Profile. Then select profile 2, and under Edit select Paste Profile .
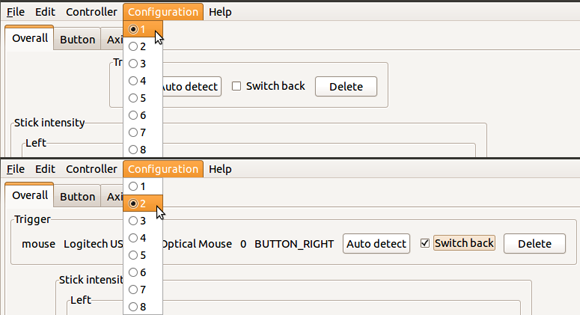
While you're still on profile 2, go to the Overall tab, click the Auto detect button in the Trigger field and click your right mouse button (or whatever you use as your aiming button) then tick the Switch back box.
Now when you hold down your right mouse button profile 2 will be activated and when you let go of the button, it'll switch back to profile 1.
Play around with the exponent and multiplier values now until it feels the way you want it when aiming down the sight.
Tip: If you would like to quickly clear out a profile slot in a configuration, select slot 8 (or any other empty profile) and copy it, then paste it over the desired slot you want to clear out.
Stick intensity
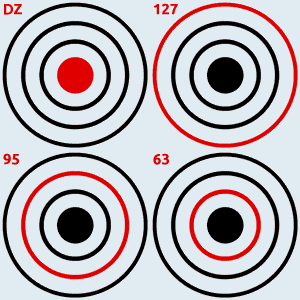
The Stick intensity function lets you assign buttons that adjust the intensity of the emulated analog sticks. Since most people will have the left stick assigned to the WASD keys, this is a handy function for changing the walking/running speed in games that would specifically require it (stealth games among others)

Using the mouse wheel as an example, since it's basically two buttons, you can assign both mouse wheel up (BUTTON_WHEELUP) and mouse wheel down (BUTTON_WHEELDOWN) to increase and decrease the left stick intensity whenever you want.
In the picture above, the Dead zone is set to 31 with 3 Steps of intensity and a circular dead zone shape, meaning you can set the intensity to 127, 95 and 63 using your mouse wheel (127 being the default, max intensity)
Calibration
Calibration may seem a bit daunting at first but is actually pretty easy once you know what everything does and you've gotten to experiment with it for a while.
Just remember, most of the time it's crucial to set your sensitivity in-game to a high value, preferably max, before starting calibration.

Multiplier
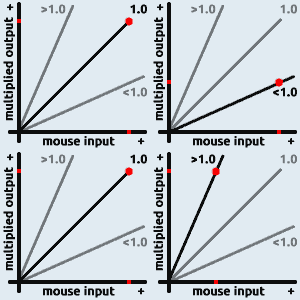
These are the values you want to increase if your aim is moving too slow (when using a low exponent or dpi for example) Think of it as sensitivity.
The x/y ratio determines how much faster your vertical (Y axis) aim is in relation to your horizontal (X axis) aim. A value of 3.0 would make you aim up and down incredibly fast, whereas 0.1 would make it almost impossible to move it up or down at all.
Tip: If you want to reverse an axis, use a negative value instead.
Dead zone
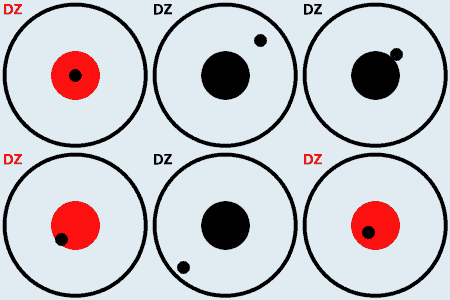
Dead zone calibration is where you will most likely get rid of jerky aim. When you calibrate the dead zone you want the aim to move as slowly and smoothly as possible (no jitters or random jumps)
The aim should start moving by itself when you increase the dead zone using the mouse wheel, so all you need to do is fine tune it until the speed of the aim is slow and fluid.
Remember to go out of dead zone calibration (by pressing rctrl+F3 for example) to test the results of your adjustments. If the aim lags in calibration mode you'll need to save your configuration (rctrl+F1) and run the emulator in normal Grab mode to test any changes you've made.
Tip: I prefer to increase the dead zone a little bit to get rid of potential jerky aim when aiming slowly. So if you find through dead zone calibration that the aim starts moving by itself at 22, I'd increase it to 25-30 instead.
Exponent
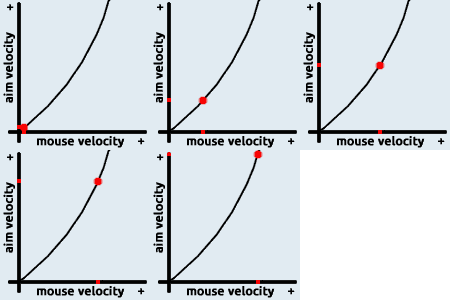
To keep it simple, think of Exponent as acceleration. An exponentially faster aim, the faster you move your mouse. It's as simple as that.
Tip: In the Call of Duty series (since Call of Duty 4) for example, an exponent of 0.39 will give you a 1:1-like aim (meaning there is little to no acceleration when moving the mouse) Having a higher exponent will make the aim accelerate but you won't need a high multiplier (the higher the multiplier is the bigger the gaps are between each "step" in the speed curve)
After having played around with these settings and you've learned what does what and how they work together, you can start fine tuning configurations to fit your personal preference or make your very own ones that we hope you'd like to share with us here on the forums!
For normalized values to start out with when making your own configurations, check out this post.
Good luck, and have fun!